Automated Installation of CentOS 6.x And Kickstart File

Today, I am going to show you how you can automate installation of CentOS version 6.0 or later without any user intervention. Just turn on computer and follow the steps ! You can use the same process for RedHat too.

Advantage:
It’s totally automated installation for a mass of computers. Just imagine that you have 250 or more workstations or you have 100 servers in production. Of course, you don’t want to install OS one by one for each machine. Instead, you should use automated installation.

You may say that we use virtualization software such as KVM,  VMWare,  VirtualBox or etc... and we can clone servers easily. But this is not true in mass installation because of following reasons:
  1.    In most virtualization software, you have to turn off the VM in order to clone it and it’s not possible in production environment
  2.    If you clone a VM, you have to configure Mac address, ip address, hostname, all network setting of cloned VM and also customize other configurations manually
  3.     You don’t have a menu with different flavour of OS to select to install. Automated installation has ability of creation a menu with different OS and changing the default selection. This gives you flexibility of installation for different OS, but clone cannot do this.
In KVM, you can use virt-install command with the same kickstart file, which I will explain later, but you are limited to using just KVM.

Automated Installation Process:
  1. Setup TFTP and PXE server
  2. Setup DHCP server
  3. Setup FTP server
  4. Setup Kickstart file
You can set up a server for TFTP/PXE, DHCP, and FTP (all of them). In my example, I set up one server for TFTP/PXE and one server for FTP.

Setup TFTP and PXE server:   

  1.  Login as root:    su –
  2. Install TFTP service:    yum install tftp-server
  3.  Run  vi /etc/xinetd.d/tftp  command and change disable to 'no'         disable = no
  4. Start xinetd service:      service xinetd start
  5. Set xinetd service to start after booting server:   chkconfig xinetd on
  6. Install syslinux, it’s a boot loader:   yum install syslinux
  7. Copy the following files from syslinux directory to the TFTP directory:
            cp /usr/share/syslinux/pxelinux.0 /var/lib/tftpboot/
            cp /usr/share/syslinux/menu.c32 /var/lib/tftpboot/
            cp /usr/share/syslinux/memdisk /var/lib/tftpboot/
            cp /usr/share/syslinux/mboot.c32 /var/lib/tftpboot/
            cp /usr/share/syslinux/chain.c32 /var/lib/tftpboot/


      8. Create the directory for your PXE menus:    mkdir /var/lib/tftpboot/pxelinux.cfg
      9. Create a directory for each pxeboot image:

            mkdir –p /var/lib/tftpboot/images/centos/x86_64/6.3
            mkdir –p /var/lib/tftpboot/images/centos/i386/6.3


     10. Download CentOS 6.x DVD1 from CentOS website
     11. Insert CentOS DVD or mount ISO file to /media directory
     12. Copy vmlinuz and initrd.img from /images/pxeboot/ directory on "DVD 1" to appropriate   release/arch directory like this:

cp /media/CentOS_6.3_Final/images/pxeboot/initrd.img /var/lib/tftpboot/images/centos/x86_64/6.3
cp /media/CentOS_6.3_Final/images/pxeboot/vmlinuz /var/lib/tftpboot/images/centos/x86_64/6.3


     13. Install DHCP server:    yum install dhcp
     14. Configure DHCP:       vi /etc/dhcp/dhcpd.conf
add the following lines to dhcpd.conf and change the ip addresses and domain name accordingly:

option domain-name      "taraghi.com";
option domain-name-servers      khosro.taraghi.com;
default-lease-time 600;
max-lease-time 7200;
authoritative;
#################The followings are mandatory to be able to boot from PXE ############
allow booting;
allow bootp;
option option-128 code 128 = string;
option option-129 code 129 = text;
next-server 10.0.0.150;
filename "/pxelinux.0";

######################################
subnet 10.0.0.0 netmask 255.255.255.0 {
        range dynamic-bootp 10.0.0.151 10.0.0.254;
        option broadcast-address 10.0.0.255;
        option routers 10.0.0.1;
}


As you can see here the ip address range is 10.0.0.151-10.0.0.254 and TFTP/PXE/DHCP server has static ip address of 10.0.0.150
     15. Restart DHCP service:     service dhcp restart
     16. Set dhcpd service to start after booting server:   chkconfig dhcpd on
     17. Adjust firewall setting, run the following commands:

          iptables -A INPUT –p udp --dport 67 -j ACCEPT
          iptables -A INPUT –p udp --dport 68 -j ACCEPT


     18. Creating a menu for OS selection and setting default OS selection after loading PXE:

          vi /var/lib/tftpboot/pxelinux.cfg/default

now, add the following lines to /var/lib/tftpboot/pxelinux.cfg/default

default menu.c32
prompt 0
timeout 30

MENU TITLE PXE Menu

LABEL CentsOS 6.3 x86_64
    MENU LABEL CentOS 6.3 x86_64
    KERNEL images/centos/x86_64/6.3/ vmlinuz
    APPEND initrd=images/centos/x86_64/6.3/initrd.img ks=ftp://10.0.0.153/pub/ks.cfg ramdisk_size=100000


If you have more images, you can also add those images above. Also, 10.0.0.153 is ftp server which contains kickstart file.

Setup FTP server:

  1. Login to FTP server as root:     su- 
  2. Install FTP server:     yum install vsftpd
  3. Insert DVD1 installation of CentOS 6.3 or mount the ISO file to /media
  4. Copy installation files to FTP public directory:
           cp -ar /media/CentOS_6.3_Final/. /var/ftp/pub/
          don’t forget dot “.”, it will copy hidden files as well

     5. Create an empty kickstart file in public directory:

            touch /var/ftp/pub/ks.cfg

     6. Set seliunx for /var/ftp/pub directory
            chcon -R -t public_content_t /var/ftp/
     7. Set up firewall:
            iptables -A INPUT -p tcp -m state --state NEW --dport 21 -j ACCEPT
     8. Save firewall setting:
           /etc/init.d/iptables save
     9. Start FTP service:   
          service vsftpd restart
    10. Set vsftpd to start after rebooting server:
          chkconfig vsftpd on

Setup Kickstart file:

    Edit ks.cfg:  vi  /var/ftp/pub/ks.cfg
    Add following lines to this file. I explain them with comments:

#It starts the installation process
Install
#configure a connection to a FTP server to locate installation files
url --url ftp://10.0.0.153/pub/
#setup language and keyboard
lang en_US.UTF-8
keyboard us

#Get network info from DHCP server
network --device eth0 bootproto dhcp
#setup encrypted root password, you can take out the encrypted password from /etc/shadow file
rootpw --iscrypted $6$NF6F/Yng442eA8oL$c/sHM
#setup firewall and open ssh port 22
firewall --service=ssh
#sets up the Shadow Password Suite
#(--enableshadow), the SHA 512 bit encryption algorithm for password encryption
#(--passalgo=sha512), and authentication with any existing fingerprint reader.
authconfig --enableshadow --passalgo=sha512 --enablefingerprint
#The selinux directive can be set to --enforcing, --permissive, or --disabled
selinux --enforcing
#setup timezone
timezone America/Toronto
#The default bootloader is GRUB. It should normally be installed on the Master
#Boot Record (MBR) of a hard drive. You can include a --driveorder switch to specify
#the drive with the bootloader and an --append switch to specify commands for
#the kernel.
bootloader --location=mbr --driveorder=sda --append=”crashkernel=auto rhgb quiet”
#Clear the Master Boot Record
zerombr yes
#This directive clears all volumes on the sda hard drive. If it hasn’t been used before,
#--initlabel initializes that drive.
clearpart --all --drives=sda --initlabel
#Changes are required in the partition (part) directives that follow.
part /boot --fstype=ext4 --size=500
part / --fstype=ext4 --size=27500
part swap --size=1000
part /home --fstype=ext4 --size=1000

#reboot machine
reboot
#skip answers to the First Boot process
firstboot --disable

%packages
              # This is the actual package install section. The
              # resolvedeps option allows you to make mistakes and
              # have anaconda sort it out for you, i.e. resolving
              # package dependencies.
@ Base
@ Development Tools
mc
wget

#If you want to switch to GUI mode, you have to install the following packages
@ basic-desktop
@ desktop-platform
@ x11
@ fonts
%end


%post
#Adding a user, in this case”khosro”
useradd -m khosro
#Set password for user “khosro”
echo Khosropass123 | passwd --stdin khosro
#expire the password and force the user to enter the new password after first login
passwd -e khosro
#Turn on the GUI mode, if you want to
sed -i 's/id:3:initdefault:/id:5:initdefault:/g' /etc/inittab

And that’s all. As soon as you turn on computer, you machine will go to Automated Installation mode without any user intervention.
 

OpenNMS installation on Windows Platform (Step by Step)

While on an official assignment i was asked to deploy open source Network Management System on the windows platform. While working on the task i got some problems and issues for which i was not able to find solution on internet and i got solution using hit and trial method. And then I thought to write on these problems and their solutions. But at the first step I will write step by step guide to install the of OpenNMS on Windows Platform (i.e. Windows XP or Win Server 2003)

Installation of OpenNMS will consist of 4 steps,

1. Installation of Java Development Kit
2. Installation of PostgreSQL
3. Initialize the Database
4. Adding JRRD library
5. installation of OpenNMS

1. Installation of Java Development Kit
  • Download the latest version of Java SE JDK from Java official website java.sun.com
  • Remember JDK is not just JRE and you need to download Java SE (Standard Edition) and not Java EE or Java ME or Java FX.
  • Run the JDK installer and it will ask for the License Agreement.
  • Click the Accept Button.
  • Click Next and installation will begin.
  • It will prompt to install JRE. Click Next to install JRE and then you will get the final window.
  • Press the Finish button to complete the installation of Java SE JDK.
2. Installation of PostgreSQL
  • Click next to proceed the installation
  • If it is required to change the destination path then select the installation directory, or simply press Next to proceed.
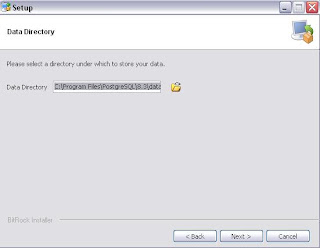
  • If it is required to change the destination Data Directory path then select the directory, or simply press Next to proceed.
  • Enter the password for the Superuser and Service account i.e. POSTGRES and press Next.
  • Enter the Server Listening port (Recommended to use the default port), and press Next.
  • Choose appropriate Locale or use Default locale and press Next.
  • Setup is now ready to install. Press Next to start installation.
  • Wait till the installer continues and finish screen appears.
  • Press the finish button to complete the installation.
3. Initialize the Database
  • If for any reason during the installation default database is not initialized then it can be done manually. Open the command prompt and go to the Bin directory of PostgreSQL. In my case it is "C:\Program Files\PostgreSQL\8.3\bin"
  • Initialize the database by using the following command "initdb -E UTF-8 -U postgres ..\data"
  • If "../data exists but is not empty" message appears then it means the Database is already initialized.
  • Run the Server by going to Start Menu --> Programs --> postgresql 8.X and click Start Server.
  • Follow the same path and click pgAdmin III.
  • Double click on postgresql 8.X (localhost:5432) to connect to the Database.
  • It will prompt for the password. Enter password and press OK button.
  • Select the postgres Database by following Databases --> Postgres.
  • Go to the file menu and select Options.
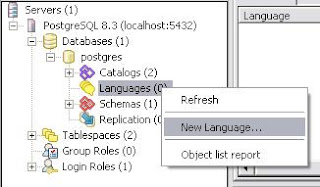
  • Under the Display tab activate the Languages as shown above, and press OK button.
  • Go back to the database postgres and expand it. Now Languages option will be available under tree. right click Languages and select New Language.
  • From the Name drop down menu select plpgsql and press OK button to add the language.
  • Exit pgAdmin.
4. Adding JRRD Library
  • Now JRRD is no longer distributed as part of OpenNMS. If you want to be compatible with RRDTool instead of JRobin then download JRRD from here.
  • Add library to the path variable.
5.
Installation of OpenNMS
  • Download latest version of standalone-opennms-installer-X.X.X.jar from the OpenNMS download page.
  • When download is finished then double click the Jar installer and it will start installation. If internet explorer saves the file as a ZIP file which contains different folders then it means that you have not installed java SDK.
  • Click Next.
  • Accept the license agreement and press Next button.
  • Select JDK home directory and select Next.
  • Select Installation directory and select Next.
  • Enter postgres user password and press Next.
  • Enter IP range to Discover nodes and press Next.
  • Press Next.
  • When installation completes press Next button.
  • When configuration and database installation completes press Next.
  • Click Done to finish the installation.
  • Open the command prompt and goto the openNMS bin directory. by default it would be C:\program files\opennms\bin
  • If you are installing the JRRD separately and your JRRD.jar file is placed at c:\opennms\lib then run following command
install.bat -disl "c:\opennms\lib"
  • Execute the following command
opennms.bat start
  • open your browser and open the link http://localhost:8980/opennms
  • Use admin user name and admin password to login to the web console.
  • and you are ready to Go with OpenNMS

Install WordPress 3.5.2 Using LAMP or LEMP on RHEL, CentOS & Fedora


Well, on the internet you will find a number of good and better ways to install WordPress on Linux, but this installation guide is prepared for my future reference as well as for those beginners who are new to WordPress and Linux platform. In this installation I will show you’ll how to install latest WordPress 3.5.2 on RHEL 6.4/6.3/6.2/6.1/6/5.8, CentOS 6.4/6.3/6.2/6.1/6/5.8 and Fedora 18,17,16,15,14,13,12 distributions.
Install WordPress in Linux
Install WordPress Using Apache and Nginx
This guide has two way of installation, one is using LAMP (Linux, Apache, MySQL, PHP) and other is LEMP (Linux, Nginx, MySQL, PHP). So, please select your installation method based on your web servers. Before moving ahead let me provide you a little description about WordPress, LAMP & LEMP.

What Is WordPress?

WordPress is an open source and free blogging application and a dynamic CMS (Content Management System) developed using MySQL and PHP. It has huge number of third party plugins and themes. WordPress currently one of the most popular blogging platform available on the internet and used by millions of people across the globe.

What Is LAMP and LEMP?

LAMP (Linux, Apache, MySQL, PHP) and LEMP (Linux, Nginx, MySQL, PHP) is an open source Web application platform that runs on Linux systems. Apache and Nginx both are Web servers, MySQL is RDMS (Relational Database Management System) and PHP is a server side scripting language.
Install WordPress 3.5.2 on RHEL 6.4/6.3/6.2/6.1/6/5.8, CentOS 6.4/6.3/6.2/6.1/6/5.8 and Fedora 18,17,16,15,14,13,12
As I said above the installation method has two ways, one is using Apache and other is Nginx. So I have named it A and B. Those who want to install WordPress on their Apache server they can use A method and those who want to install WordPress using Nginx they can follow method B. In case, if you don’t have LAMP or LEMP setup on your systems, please use the following guides to install it.

Method A: Installing WordPress 3.5.2 for Apache on RHEL, CentOS & Fedora

This Method A installation guide shows you how to install latest WordPress 3.5.2 using LAMP setup on RHEL 6.4/6.3/6.2/6.1/6/5.8, CentOS 6.4/6.3/6.2/6.1/6/5.8 and Fedora 18,17,16,15,14,13,12.

Step 1: Downloading WordPress 3.5.2 for Apache

You must be root user to download the package.
# cd /tmp
# wget http://wordpress.org/latest.tar.gz

Step 2: Extracting WordPress 3.5.2 for Apache

Once the download finishes, run the following command to untar it.
# tar -xvzf latest.tar.gz -C /var/www/html

Step 3: Creating MySQL Database WordPress

Connect to MySQL server and run the following commands to create database and grant privileges.
## Connect to MySQL Server & Enter Password (if any or leave blank)## 
mysql -u root -p
Enter password:

## Creating New User for WordPress Database ##
CREATE USER wordpress@localhost IDENTIFIED BY "your_password_here";

## Create New Database ##
create database wordpress;

## Grant Privileges to Database ##
GRANT ALL ON wordpress.* TO wordpress@localhost;

## FLUSH privileges ##
FLUSH PRIVILEGES;

## Exit ##
exit
Please replace text a shown in Red color with your appropriate Database Name, User and Password. These settings we will required later.

Step 4: Creating Apache VirtualHost for WordPress

Open the file /etc/httpd/conf/httpd.conf with VI editor.
# vi /etc/httpd/conf/httpd.conf
Add the following lines of code at the bottom of the file. Replace the text shown in Red color with your required settings.

  ServerAdmin tecmint@tecmint.com
  DocumentRoot /var/www/html/wordpress
  ServerName wordpress
  ErrorLog /var/log/httpd/wordpress-error-log
  CustomLog /var/log/httpd/wordpress-acces-log common
Next, restart the Apache service to reflect changes.
# service httpd restart
Add the following line to /etc/hosts file.
127.0.0.1  wordpress

Step 5: Configuring WordPress Installation

Copy default wp-config-sample.php to wp-config.php to configure WordPress installation.
# cd /var/www/html/wordpress
# cp wp-config-sample.php wp-config.php
Open wp-config.php file.
# vi wp-config.php
Modify the following database settings as we created in the Step #3 above.
// ** MySQL settings - You can get this info from your web host ** //
/** The name of the database for WordPress */
define('DB_NAME', 'database_name_here');

/** MySQL database username */
define('DB_USER', 'username_here');

/** MySQL database password */
define('DB_PASSWORD', 'password_here');

/** MySQL hostname */
define('DB_HOST', 'localhost');

/** Database Charset to use in creating database tables. */
define('DB_CHARSET', 'utf8');

/** The Database Collate type. Don't change this if in doubt. */
define('DB_COLLATE', '');

Step 6: Finishing WordPress Installation

Open your browser and type any of the following address.
http://wordpress/

http://localhost


http://your-ip
Give your Site Title, Create Admin User, Create Admin Password, Enter Your E-Mail and then click on Install button.
Creating WordPress Admin Login
Login into your WordPress Dashboard.
WordPress Login Screen
Enter your WordPress Login details.
Enter WordPress Login Details
Welcome to WordPress Dashboard.
Welcome to WordPress Dashboard
View your New WordPress blog.
View WordPress Blog
View WordPress Blog

Method B: Installing WordPress 3.5.2 for Nginx on RHEL, CentOS & Fedora

Step 1: Creating WordPress Directories for Nginx

# mkdir -p /srv/www/wordpress/public_html
# mkdir /srv/www/wordpress/logs
# chown -R nginx:nginx /srv/www/wordpress

Step 2: Downloading and Extracting WordPress 3.5.2 for Nginx

cd /tmp
# wget http://wordpress.org/latest.tar.gz
# tar -xvzf latest.tar.gz -C /srv/www/wordpress/public_html --strip-components=1

Step 3: Creating MySQL Database WordPress

Connect to MySQL server and run the following commands to create database and grant privileges.
## Connect to MySQL Server & Enter Password (if any or leave blank)## 
mysql -u root -p
Enter password:

## Creating New User for WordPress Database ##
CREATE USER wordpress@localhost IDENTIFIED BY "your_password_here";

## Create New Database ##
create database wordpress;

## Grant Privileges to Database ##
GRANT ALL ON wordpress.* TO wordpress@localhost;

## FLUSH privileges ##
FLUSH PRIVILEGES;

## Exit ##
exit
Please replace text a shown in Red color with your appropriate Database Name, User and Password. These settings we will required later.

Step 4: Creating Nginx VirtualHost For WordPress

If you’ve followed our LEMP guide these directories are already created. In case, if not then please create it by running these commands.
# mkdir /etc/nginx/sites-available
# mkdir /etc/nginx/sites-enabled
Add the following line of code to /etc/nginx/nginx.conf file, After the line that says “include /etc/nginx/conf.d/*.conf.
include /etc/nginx/sites-enabled/*;
Next create Nginx virtualhost file for WordPress.
# vi /etc/nginx/sites-available/wordpress
Add the following content to /etc/nginx/sites-available/wordpress file.
server {
    server_name wordpress;
    access_log /srv/www/wordpress/logs/access.log;
    error_log /srv/www/wordpress/logs/error.log;
    root /srv/www/wordpress/public_html;

    location / {
        index index.php;
    }

    # Disable favicon.ico logging
    location = /favicon.ico {
        log_not_found off;
        access_log off;
    }

    # Allow robots and disable logging
    location = /robots.txt {
        allow all;
        log_not_found off;
        access_log off;
    }

    # Enable permalink structures
    if (!-e $request_filename) {
        rewrite . /index.php last;
    }

    # Handle php requests
    location ~ \.php$ {
        include /etc/nginx/fastcgi_params;
        fastcgi_pass  127.0.0.1:9000;
        fastcgi_index index.php;
        fastcgi_param SCRIPT_FILENAME /srv/www/wordpress/public_html$fastcgi_script_name;
    }

    # Disable static content logging and set cache time to max
    location ~* \.(js|css|png|jpg|jpeg|gif|ico)$ {
        expires max;
        log_not_found off;
    }

    # Deny access to htaccess and htpasswd files
    location ~ /\.ht {
        deny  all;
    }
}
Create symlink for sites enabled directory.
# cd /etc/nginx/sites-enabled/
# ln -s /etc/nginx/sites-available/wordpress
Restart the Nginx server to reflect changes.
# service nginx restart
Add the following line to /etc/hosts file.
127.0.0.1  wordpress

Step 5: Configuring WordPress Installation

Copy default wp-config-sample.php to wp-config.php to configure WordPress installation.
# cd /srv/www/wordpress/public_html
# cp wp-config-sample.php wp-config.php
Modify the following database settings as we created in the Step #3 above.
// ** MySQL settings - You can get this info from your web host ** //
/** The name of the database for WordPress */
define('DB_NAME', 'database_name_here');

/** MySQL database username */
define('DB_USER', 'username_here');

/** MySQL database password */
define('DB_PASSWORD', 'password_here');

/** MySQL hostname */
define('DB_HOST', 'localhost');

/** Database Charset to use in creating database tables. */
define('DB_CHARSET', 'utf8');

/** The Database Collate type. Don't change this if in doubt. */
define('DB_COLLATE', '');
Now follow STEP 6 above for the WordPress installation.
In case, if you are having any trouble while installing please do let me know via comments and don’t forget to share this article with your friends.

How to set up an Ldap Server on Ubuntu 12.04 LTS

Today I will show you how to set up an ldap server on Ubuntu 12.04 LTS.


First we need to install the packages we need so in a terminal type:
sudo apt-get install slapd ldap-utils
During installation you will be asked for an ldap administrator password.  You should choose one and then retype it.
The configurations example that follows uses a FQDN of comtech.com. You should change this to the FQDN of your organisation.
Now we need to add some additional schema files. In a terminal enter:
sudo ldapadd -Y EXTERNAL -H ldapi:/// -f /etc/ldap/schema/cosine.ldif
sudo ldapadd -Y EXTERNAL -H ldapi:/// -f /etc/ldap/schema/nis.ldif
sudo ldapadd -Y EXTERNAL -H ldapi:/// -f /etc/ldap/schema/inetorgperson.ldif
Now make a file called backend.comtech.com.ldif somewhere on your system and add the following configuration to it.
# Load dynamic backend modules
dn: cn=module,cn=config
objectClass: olcModuleList
cn: module
olcModulepath: /usr/lib/ldap
olcModuleload: back_hdb.la
# Database settings
dn: olcDatabase=hdb,cn=config
objectClass: olcDatabaseConfig
objectClass: olcHdbConfig
olcDatabase: {1}hdb
olcSuffix: dc=comtech,dc=com
olcDbDirectory: /var/lib/ldap
olcRootDN: cn=admin,dc=comtech,dc=com
olcRootPW: secret
olcDbConfig: set_cachesize 0 2097152 0
olcDbConfig: set_lk_max_objects 1500
olcDbConfig: set_lk_max_locks 1500
olcDbConfig: set_lk_max_lockers 1500
olcDbIndex: objectClass eq
olcLastMod: TRUE
olcDbCheckpoint: 512 30
olcAccess: to attrs=userPassword by dn=”cn=admin,dc=comtech,dc=com” write by anonymous auth by self write by * none
olcAccess: to attrs=shadowLastChange by self write by * read
olcAccess: to dn.base=”" by * read
olcAccess: to * by dn=”cn=admin,dc=comtech,dc=com” write by * read
We now need to add the LDIF to the directory so in a terminal type:
sudo ldapadd -Y EXTERNAL -H ldapi:/// -f  backend.comtech.com.ldif
Now create a file called frontend.comtech.com.ldif somewhere on your system and add the following configuration to it.
# Create top-level object in domain
dn: dc=comtech,dc=com
objectClass: top
objectClass: dcObject
objectclass: organization
o: Comtech
dc: comtech
description: Comtech LDAP Configuration
# Admin user.
dn: cn=admin,dc=comtech,dc=com
objectClass: simpleSecurityObject
objectClass: organizationalRole
cn: admin
description: LDAP administrator
userPassword: (ADD YOUR OWN PASSWORD HERE)
dn: ou=people,dc=comtech,dc=com
objectClass: organizationalUnit
ou: people
dn: ou=groups,dc=comtech,dc=com
objectClass: organizationalUnit
ou: groups
dn: uid=bob,ou=people,dc=comtech,dc=com
objectClass: inetOrgPerson
objectClass: posixAccount
objectClass: shadowAccount
uid: Bob
sn: Wates
givenName: Bob
cn: Bob Wates
displayName: Bob Wates
uidNumber: 1000
gidNumber: 10000
userPassword: password
gecos: Bob Wates
loginShell: /bin/bash
homeDirectory: /home/bob
shadowExpire: -1
shadowFlag: 0
shadowWarning: 7
shadowMin: 8
shadowMax: 999999
shadowLastChange: 10877
mail: bob.wates@comtech.com
postalCode: CF24
l: Cardiff
o: Comtech
mobile: +44 (0)7 xx xx xx xx
homePhone: +44 (0)1 xx xx xx xx x
title: System Administrator
postalAddress:
initials: BW
dn: cn=comtech,ou=groups,dc=comtech,dc=com
objectClass: posixGroup
cn: comtech
gidNumber: 10000
Now we need to add the entries to the LDAP directory.  In a terminal type:
sudo ldapadd -x -D cn=admin,dc=comtech,dc=com -W -f frontend.comtech.com.ldif
You will be asked for the ldap administration password.  This is the password in the admin section of the frontend.comtech.com.ldif file.
All that is left to do is to test the configuration so in a terminal type:
ldapsearch -xLLL -b “dc=comtech,dc=com” uid=bob sn givenName cn
If your files are configured correctly then you get the following output.
dn: uid=bob,ou=people,dc=comtech,dc=com
cn: Bob Wates
sn: Wates
givenName: Bob