How to Install and Configure Ansible on CentOS 7

In this article, we will learn how to configure Ansible on CentOS 7 which is an Automation configuration management system. This system can control a large number of client machines with an easy administration, which can be automated from a central location.
Ansible communicates over SSH tunnels and it doesn’t need to install any software on the client machine and it can retrieve information from the remote ansible machines which issues commands and copies the files.
The Ansible configuration files mainly use the YAML data formation as it can be due to expressive and similarity of popular languages. The clients can be communicated using the command line tools or using with the playbooks.

Prerequisites

  • We need CentOS 7 and root user.
  • Needed SSH keys for the users.

Installing Ansible on CentOS 7

Since we need to install Ansible software on one machine, it will not be available in the CentOS default repository. Hence, we should add the Ansible personal package to archive the system.
Below is the command to add to the repository –
$ sudo yum install epel-release -y
Output:
Loaded plugins: fastest mirror
Loading mirror speeds from cached hostfile
* base: mirror.fibergrid.in* extras: mirror.digistar.vn
* updates: mirror.digistar.vn
Resolving Dependencies
--> Running transaction check
---> Package epel-release.noarch 0:7-9 will be installed
--> Finished Dependency Resolution
Dependencies Resolved
================================================================================
Package                Arch             Version         Repository        Size
================================================================================
Installing:
epel-release           noarch           7-9             extras            14 k
Transaction Summary
================================================================================
Install  1 Package
Total download size: 14 k
Installed size: 24 k
Downloading packages:
epel-release-7-9.noarch.rpm                                |  14 kB   00:00
Running transaction check
Running transaction test
Transaction test succeeded
Running transaction
Installing : epel-release-7-9.noarch                                      1/1
Verifying  : epel-release-7-9.noarch                                      1/1
Installed:
epel-release.noarch 0:7-9
Complete!
Once the Epel repository is updated, we need to update the system so that we have the dependencies installed perfectly.
$ sudo yum update –y
Output:
Loaded plugins: fastestmirror
Loading mirror speeds from cached hostfile
* base: mirror.fibergrid.in
* epel: epel.mirror.angkasa.id
* extras: mirror.digistar.vn
* updates: mirror.digistar.vn
Resolving Dependencies
--> Running transaction check
---> Package NetworkManager.x86_64 1:1.0.6-31.el7_2 will be updated
---> Package NetworkManager.x86_64 1:1.4.0-14.el7_3 will be an update
--> Processing Dependency: libjansson.so.4()(64bit) for package: 1:NetworkManager-1.4.0-14.el7_3.x86_64
---> Package NetworkManager-libnm.x86_64 1:1.0.6-31.el7_2 will be updated
---> Package NetworkManager-libnm.x86_64 1:1.4.0-14.el7_3 will be an update
---> Package NetworkManager-tui.x86_64 1:1.0.6-31.el7_2 will be updated
---> Package NetworkManager-tui.x86_64 1:1.4.0-14.el7_3 will be an update
---> Package NetworkManager-wifi.x86_64 1:1.0.6-31.el7_2 will be updated
---> Package NetworkManager-wifi.x86_64 1:1.4.0-14.el7_3 will be an update
---> Package alsa-lib.x86_64 0:1.0.28-2.el7 will be updated
---> Package alsa-lib.x86_64 0:1.1.1-1.el7 will be an update
…
…
Fetched 19.5 kB in 1s (18.2 kB/s)
Reading package lists... Done
Complete!
Once the package repository is updated, we will install the Ansible using the below command –
$ sudo yum install ansible -y
Output:
Loaded plugins: fastestmirror
epel/x86_64/metalink                                                                                                                             | 4.8 kB  00:00:00
epel                                                                                                                                             | 4.3 kB  00:00:00
(1/3): epel/x86_64/group_gz                                                                                                                      | 170 kB  00:00:01
(2/3): epel/x86_64/updateinfo                                                                                                                    | 721 kB  00:00:03
(3/3): epel/x86_64/primary_db                                                                                                                    | 4.5 MB  00:00:09
Loading mirror speeds from cached hostfile
* base: mirror.fibergrid.in
* epel: mirror.rise.ph
* extras: mirror.digistar.vn
* updates: mirror.digistar.vn
Resolving Dependencies
--> Running transaction check
---> Package ansible.noarch 0:2.2.1.0-1.el7 will be installed
--> Processing Dependency: sshpass for package: ansible-2.2.1.0-1.el7.noarch
--> Processing Dependency: python-six for package: ansible-2.2.1.0-1.el7.noarch
--> Processing Dependency: python-setuptools for package: ansible-2.2.1.0-1.el7.noarch
--> Processing Dependency: python-paramiko for package: ansible-2.2.1.0-1.el7.noarch
--> Processing Dependency: python-keyczar for package: ansible-2.2.1.0-1.el7.noarch
--> Processing Dependency: python-jinja2 for package: ansible-2.2.1.0-1.el7.noarch
--> Processing Dependency: python-httplib2 for package: ansible-2.2.1.0-1.el7.noarch
--> Processing Dependency: PyYAML for package: ansible-2.2.1.0-1.el7.noarch
--> Running transaction check
..
..
Verifying  : python-jinja2-2.7.2-2.el7.noarch                                                                                                                    3/19
Verifying  : python-setuptools-0.9.8-4.el7.noarch                                                                                                                4/19
Verifying  : python-backports-ssl_match_hostname-3.4.0.2-4.el7.noarch                                                                                            5/19
Verifying  : python-markupsafe-0.11-10.el7.x86_64                                                                                                                6/19
Verifying  : python-httplib2-0.7.7-3.el7.noarch                                                                                                                  7/19
Verifying  : python2-ecdsa-0.13-4.el7.noarch                                                                                                                     8/19
Verifying  : libtomcrypt-1.17-23.el7.x86_64                                                                                                                      9/19
Verifying  : python-backports-1.0-8.el7.x86_64                                                                                                                  10/19
Verifying  : ansible-2.2.1.0-1.el7.noarch                                                                                                                       11/19
Verifying  : libtommath-0.42.0-4.el7.x86_64                                                                                                                     12/19
Verifying  : python2-pyasn1-0.1.9-7.el7.noarch                                                                                                                  13/19
Verifying  : PyYAML-3.10-11.el7.x86_64                                                                                                                          14/19
Verifying  : python2-crypto-2.6.1-10.el7.x86_64                                                                                                                 15/19
Verifying  : python-babel-0.9.6-8.el7.noarch                                                                                                                    16/19
Verifying  : python-six-1.9.0-2.el7.noarch                                                                                                                      17/19
Verifying  : python2-paramiko-1.16.1-1.el7.noarch                                                                                                               18/19
Verifying  : sshpass-1.05-5.el7.x86_64                                                                                                                          19/19
Installed:
ansible.noarch 0:2.2.1.0-1.el7
Dependency Installed:
PyYAML.x86_64 0:3.10-11.el7                                          libtomcrypt.x86_64 0:1.17-23.el7                 libtommath.x86_64 0:0.42.0-4.el7
libyaml.x86_64 0:0.1.4-11.el7_0                                      python-babel.noarch 0:0.9.6-8.el7                python-backports.x86_64 0:1.0-8.el7
python-backports-ssl_match_hostname.noarch 0:3.4.0.2-4.el7           python-httplib2.noarch 0:0.7.7-3.el7             python-jinja2.noarch 0:2.7.2-2.el7
python-keyczar.noarch 0:0.71c-2.el7                                  python-markupsafe.x86_64 0:0.11-10.el7           python-setuptools.noarch 0:0.9.8-4.el7
python-six.noarch 0:1.9.0-2.el7                                      python2-crypto.x86_64 0:2.6.1-10.el7             python2-ecdsa.noarch 0:0.13-4.el7
python2-paramiko.noarch 0:1.16.1-1.el7                               python2-pyasn1.noarch 0:0.1.9-7.el7              sshpass.x86_64 0:1.05-5.el7
Complete!

Ansible Hosts Configuring

We need to keep track of all the servers and clients from ‘hosts’ file, we also need to create the hosts file so that we can start communicating with the other client or server machines.
$ sudo nano /etc/ansible/hosts
When we open the configuration file, we will see that all the commented lines and none of the configuration in the files works, as we need to add the below demo machines.

General Syntax for adding the Host or Client in the Group adds

[group_name]
Alias anisible_ssh_host=your_ansible_server_ip_address

Sample Configuration File

[Ansible_server]
Client1 ansible_ssh_host=192.168.0.10
Client2 ansible_ssh_host=192.168.0.11
We needed to configure so that SSH keys are copied to all the client machines so that they are authorized without any password.
In our scenario, we are using two client machines and all the client machines are accessible using the SSH keys without prompting for the password.
With the current configuration if we try to connect to the host with Ansible the command fails because the SSH keys are connected with the root user and we will see the below error
Client1 | UNREACHABLE! => {
"changed": false,
"msg": "Failed to connect to the host via ssh.",
"unreachable": true
}
We will create a file which tells that the servers will connect using the root user of the client machines.
$ sudo mkdir /etc/ansible/group_vars
$ sudo vi /etc/ansible/group_vars/servers
---
Ansible_ssh_user: root
We have to put the “---“ in the starting of the YAML file.
If you want to specify all the servers at a place we needed to provide those details at /etc/ansible/group_vars/all.

Executing the Simple Ansible Commands

To test our configuration we run the below command which will ping all the clients in the configuration file.Watch movie online The Transporter Refueled (2015)
$ ansible –m ping all
Output:
Client1 | SUCCESS => {
"changed": false,
"ping": "pong"
}
Client2 | SUCCESS => {
"changed": false,
"ping": "pong"
}
We can also ping the individual clients with the below example.
$ ansible –m ping servers
$ ansible –m ping clien1
We can use the shell module to run a terminal command from the Anisble to the client.
$ ansible –m shell –a ‘df –h’ client1
Output:
Client1 | SUCCESS | rc=0 >>
Filesystem               Size  Used Avail Use% Mounted on
/dev/mapper/centos-root   42G  2.6G   39G   7% /
devtmpfs                 1.9G     0  1.9G   0% /dev
tmpfs                    1.9G     0  1.9G   0% /dev/shm
tmpfs                    1.9G  8.4M  1.9G   1% /run
tmpfs                    1.9G     0  1.9G   0% /sys/fs/cgroup
/dev/sda1                494M  163M  332M  33% /boot
/dev/mapper/centos-home   21G   33M   21G   1% /home
tmpfs                    379M     0  379M   0% /run/user/0
Like the above example we will check for the free memory for the client1
$ ansible –m shell –a ‘free –m’ client1
Output:
Client1|SUCCESS|rc=0 >>
total        used        free      shared  buff/cache   available
Mem:           3.7G        868M        1.9G        8.4M        1.0G        2.6G
Swap:          2.0G          0B        2.0G

In the above article, we have learnt about – how to install and configure the Ansible and configure the clients, communicate with the client or servers and run simple commands and tasks so that we can test the configuration and execute the simple tasks remotely. We will cover the Playbooks in the further articles.

How To Install WordPress On CentOS 7 Linux

Today, we will learn how we can install WordPress on our CentOS 7 Linux distribution.

Why CentOS?

CentOS Linux is a community-supported distribution derived from sources freely provided to the public by Red Hat for Red Hat Enterprise Linux (RHEL). As such, CentOS Linux aims to be functionally compatible with RHEL. The CentOS Project mainly changes packages to remove upstream vendor branding and artwork. CentOS Linux is no-cost and free to redistribute. Each CentOS version is maintained for up to 10 years (by means of security updates — the duration of the support interval by Red Hat has varied over time with respect to Sources released). A new CentOS version is released approximately every 2 years and each CentOS version is periodically updated (roughly every 6 months) to support newer hardware. This results in a secure, low-maintenance, reliable, predictable and reproducible Linux environment.

You can download CentOS from here. You can directly download the ISO file format disk image from here.

What is WordPress?

WordPress is an open source website creation tool or content management system (CMS) based on PHP and MySQL. Matt Mullenweg and Mike Little programmed WordPress back on 2003. This is the most easiest static (can be developed for dynamic also) website content management system (or CMS) that exists.
WordPress is a free and license under GPLv2 (or later) from the Free Software Foundation. According to a survey report, WordPress was used by more than 23.3% of the top 10 million websites. WordPress is one of the most popular blogging system used on the Web.
It supports
  • Different free & paid themes for different different UI & UX
  • Plugins for different services & functionalities
  • Mobiles (Responsive views)
  • Multi-user & multi-blogging
To know more about WordPress, visit this link. To download latest WordPress from here.

Prerequisites

To install WordPress, we will need these following thing that needs to be installed or available on our CentOS 7 Linux server.
  • Apache or Nginx as web server
  • PHP version 5.6 or greater
  • MySQL / MariaDB version 5.6 or greater as database
Legacy or older version of PHP & MySQL can drive WordPress but not recommended from their official page.
Also, make sure your firewall / iptables or SELinux is not blocking any port(s) which is required over here or you don’t have any problem with proper user permission.
To disable SELinux, type the following
setenforce 0
Let’s update the CentOS 7 Linux server first. This is a good practise to keep your server up to date. To do so, issue the below command one after another and wait till it gets updated. It will depends on your internet speed and it will take a long. So, please have patience.
sudo yum clean all
sudo yum -y update
You will see something like below image once you are done with it. Depending on how old your system softwares are or which packages are needs to be updated. The below image indicates an successful update and may require to reboot system as well.
yumupdatedcentos7

Installing Apache as web server

To install Apache on your CentOS 7, issue the below command on your terminal.
sudo yum -y install httpd
This will download and install Apache as a web server on the system.
Let’s start Apache by issuing the below command.
sudo systemctl start httpd
Set Apache at start or booting time so after every reboot, it get started automatically without manual start.
sudo systemctl enable httpd

Test Apache

To test apache issue the below command.
sudo systemctl status httpd
This will show the status of Apache for you.
Or you can open a web browser and type “localhost” without the double quote in to the address bar. You will see something like this.
testing_apache_centos7
It indicates that our web server up and running ðŸ™‚
You may need to enable mod_rewrite module as well. Just open the file located on /etc/httpd/conf/httpd.conf by your faviourute file editor and change the following line
AllowOverride None
to
AllowOverride All
We are done with Apache.

Installing MySQL / MariaDB

To install MySQL / MariaDB on to your system, issue the below command.
sudo yum install mariadb-server mariadb
This will download and install MySQL / MariaDB on to the system.
To start the MariaDB server, issue the below command.
sudo systemctl start mariadb
Now, we need to set the password for the “root” user of MySQL / MariaDB. Let’s do it by typing the following and this is must for security reason.
sudo mysql_secure_installation
You will see something like this. Hit Y to continue and type a complex password and remember it.
CentOS7_security
After setting the root password, you will see something like below image.
afterrootpasswordCentOS7
Now, you will get few prompts on your terminal with Y/N options.
Hit Y for the prompt “Remove anonymous users?”
Hit Y for the prompt “Disallow root login remotely?”
Hit Y for the prompt “Remove test database and access to it?”
Hit Y for the prompt “Reload privilege tables now?”
After finishing all the prompts, you will see something like below.
finishmariadbCentOS7
We are done with MySQL / MariaDB.

Installing PHP 

To install PHP, open a terminal and issue the below command.
sudo yum -y install php php-mysql php-gd php-ldap php-odbc php-pear php-xml php-xmlrpc php-mbstring php-snmp php-soap curl
This will download and install PHP on your CentOS 7 system along with some others PHP modules which are required for WordPress.

Installing phpMyAdmin

To install phpMyAdmin, issue the below command in the terminal.
sudo yum -y install epel-release
And then issue the below command again.
sudo yum -y install phpmyadmin
After installing PHP, we need to restart the Apache or other web server in order to work with PHP. Type the following to do so.
sudo systemctl restart httpd.service
To test whether you can access phpMyAdmin or not, open any web browser and type the following in the address bar.
localhost/phpmyadmin
You will see something like this.
phpmyadminCentOS7
We are done installing PHP.

Installing WordPress

Download the latest WordPress from here. Or use the below command to download it.
sudo wget https://wordpress.org/latest.zip
After downloading the zip archive file, let’s unzip it by typing the below command on the terminal.
sudo unzip latest.zip
After successful unzipping, you will see a folder named “wordpress”. Now, copy this “wordpress” folder to the /var/www/html folder path by doing the following.
sudo cp -avr wordpress /var/www/html
Now, move to the /var/www/html folder and issue the below two commands.
sudo chmod -R 775 wordpress
sudo chown apache:apache wordpress
Now, type the following in your web browser address bar.
localhost/wordpress
You will see the below image. Click “Let’s go!” for continue.
1stwordpresscentos7
After clicking “Let’s go!” button, you will see something like this.
wordpresssetp2centos7
Now, we need to create a database with a name whatever you wish for installing WordPress.
Let’s create the database then. To do so, open the web browser and type the following.
localhost/phpmyadmin
Then it will ask for a user name & password. Type “root” as user name and the password that you had set earlier while installing MySQL/ MariaDB. I hope that you can remember that. Once you are logged in, you will see something like this.
phpmyadmincenos7
Now click New from the left top corner marked as red in the following image.
phpmyadmincenos7step2
After clicking New, you will see this. Type a database name and click “Create” button. Here, I am typing iftekher for my database name. You can type whatever you wish.
creatingdbcentos7
We are done creating our database for installing WordPress.
Now move back to the WordPress installation.
Type the database name as iftekher (As I set iftekher as my database name), user name as root, root password and leave database host and table prefix as it is. It should look like below image. Click submit button to continue.
settingupcentos7
After this, you will see a similar image like below and you need to click “Run the install” button.
runthecentos7
Then, you will see a welcome screen just like below asking for your WordPress site title, user name, password which are related to your WordPress site. Type your the site title, type admin as user name and choose a hard password and enter your email address and click “Install WordPress”.
welcomewpcentos7
Then you will get a message that WordPress has been successfully installed on your CentOS7.
Now, type the following in your web browser address bar and you will see something like this.
localhost/wordpress
livewpcentos7
So we are done with installing WordPress on our CentOS 7 Linux server.
Have a great day.

How to install and Configure Jenkins on CentOS 7 and RHEL 7

How to install and Configure Jenkins on CentOS 7 and RHEL 7


Jenkins is free and open source continues integration tool and it’s code is written in Java. It provides the feature of continues build and deployment or in other words we can say it is a automation server. Jenkins are used where continues build and integration is going on for software development.
In this post i will discuss how to install and configure Jenkins on CentOS 7 and RHEL 7.

Step:1 Add Jenkins Repository

Jenkins package is not available in the default CentOS and RHEL repositories. So we need to add jenkins repository using the beneath commands.
[root@jenkins ~]# wget -O /etc/yum.repos.d/jenkins.repo http://pkg.jenkins.io/redhat-stable/jenkins.repo
[root@jenkins ~]# rpm --import http://pkg.jenkins.io/redhat-stable/jenkins.io.key

Step:2 Install Jenkins and Java

Run the below  yum command to install Jenkins and java.
[root@jenkins ~]# yum install jenkins java-1.7.0-openjdk –y

Step:3 Start and Enable Jenkins Service

Run the following systemctl commands to start and enable the jenkins service
[root@jenkins ~]# systemctl start jenkins
[root@jenkins ~]# systemctl enable jenkins

Step:4 Open the ports (80 and 8080) in OS firewall.

In case firewall is enabled on your Linux server then run the following commands to open jenkins related ports like 80 and 8080.
[root@jenkins ~]# firewall-cmd --zone=public --add-port=8080/tcp --permanent
success
[root@jenkins ~]# firewall-cmd --zone=public --add-service=http --permanent
success
[root@jenkins ~]# firewall-cmd --reload
success
[root@jenkins ~]#
Step:5 Access the Jenkins Web portal
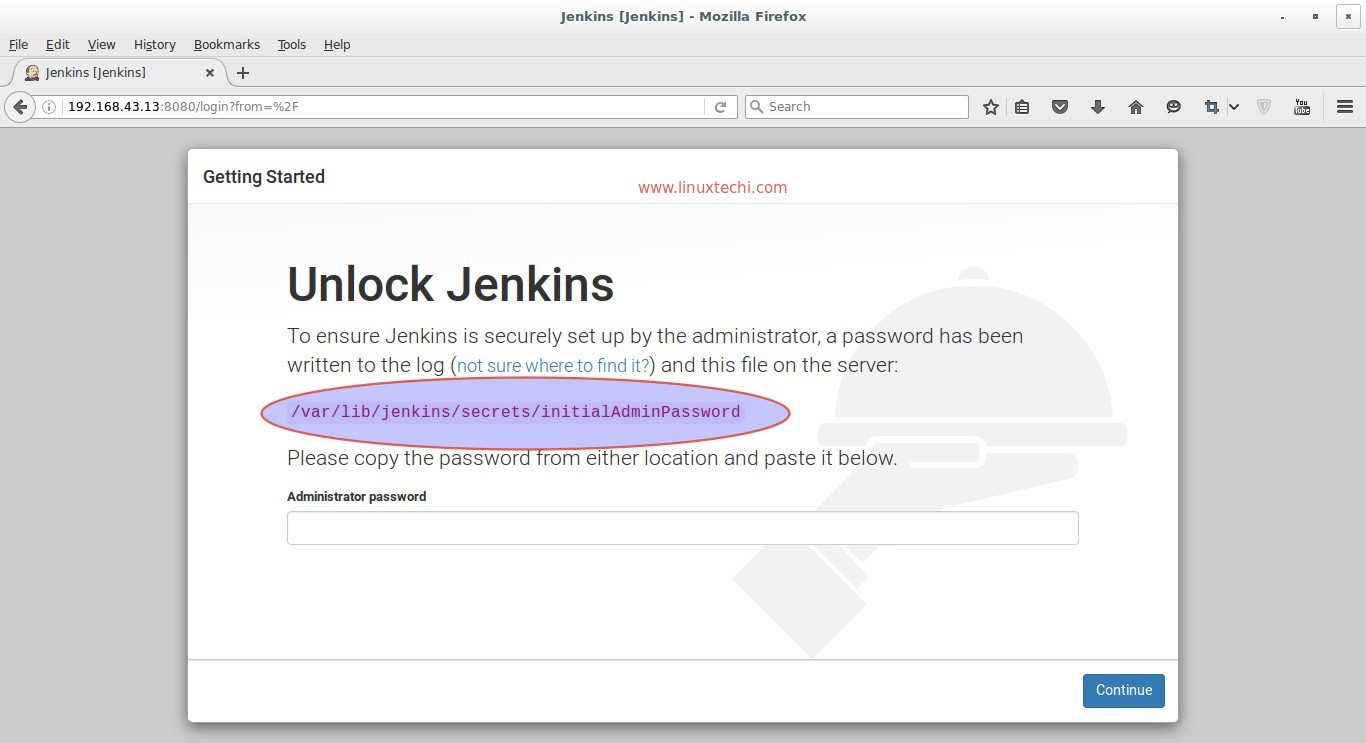
Access the URL : http://<Ip-Address-of-your-Server>:8080
Jenkins-administrator-password-centos7
Admin password is created and stored in the log file  “/var/log/jenkins/jenkins.log“. Run the below command to get the password.
[root@jenkins ~]# grep -A 5 password /var/log/jenkins/jenkins.log
Copy the password and paste it in above windows and click on Continue..
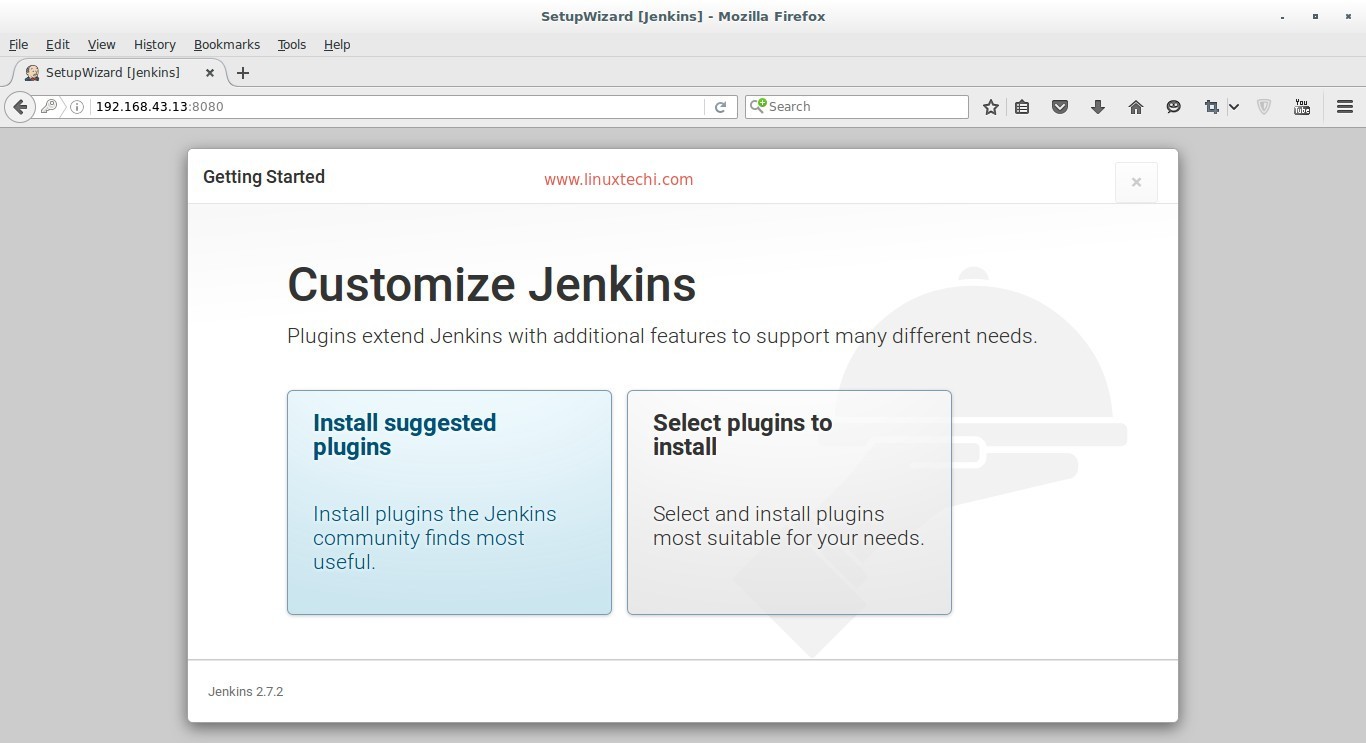
In the next windows Select the option : Install suggested plugins
SetupWizard-Jenkins-Centos7
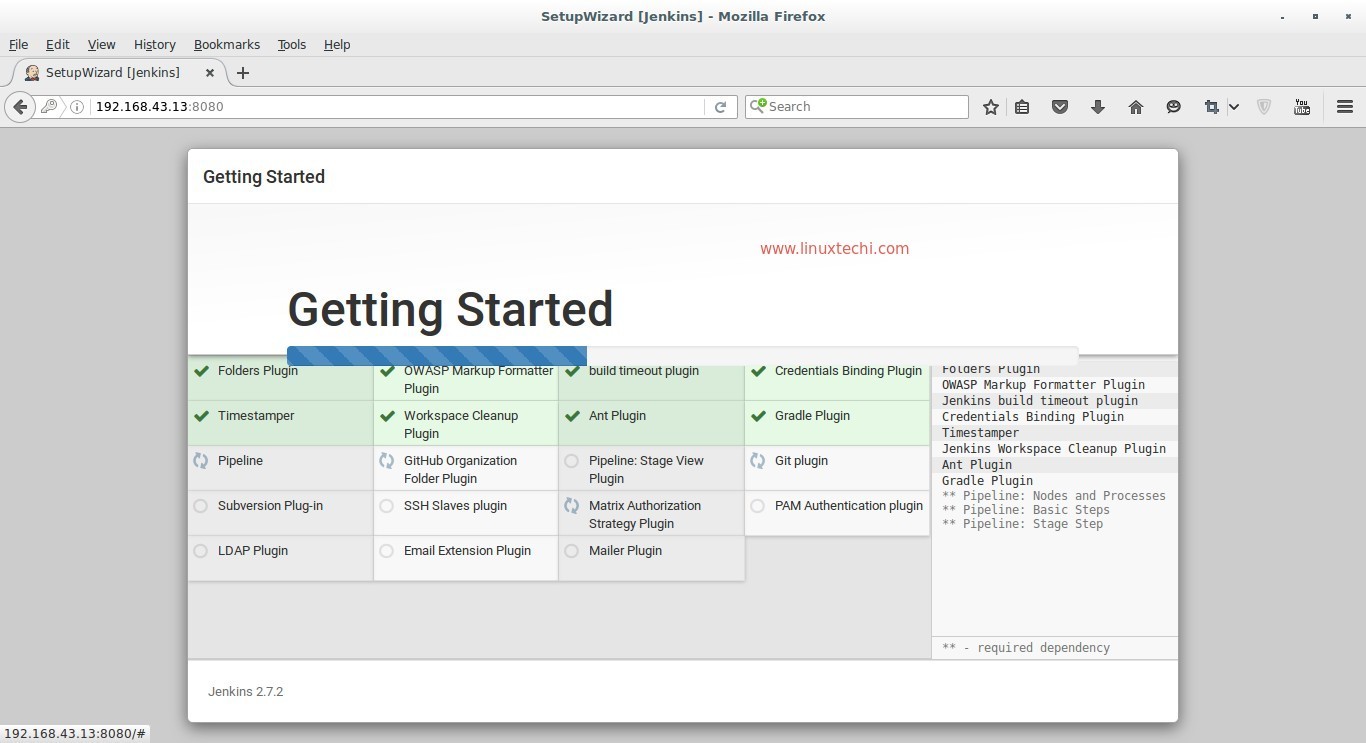
SetupWizard-Jenkins-plugin-installation
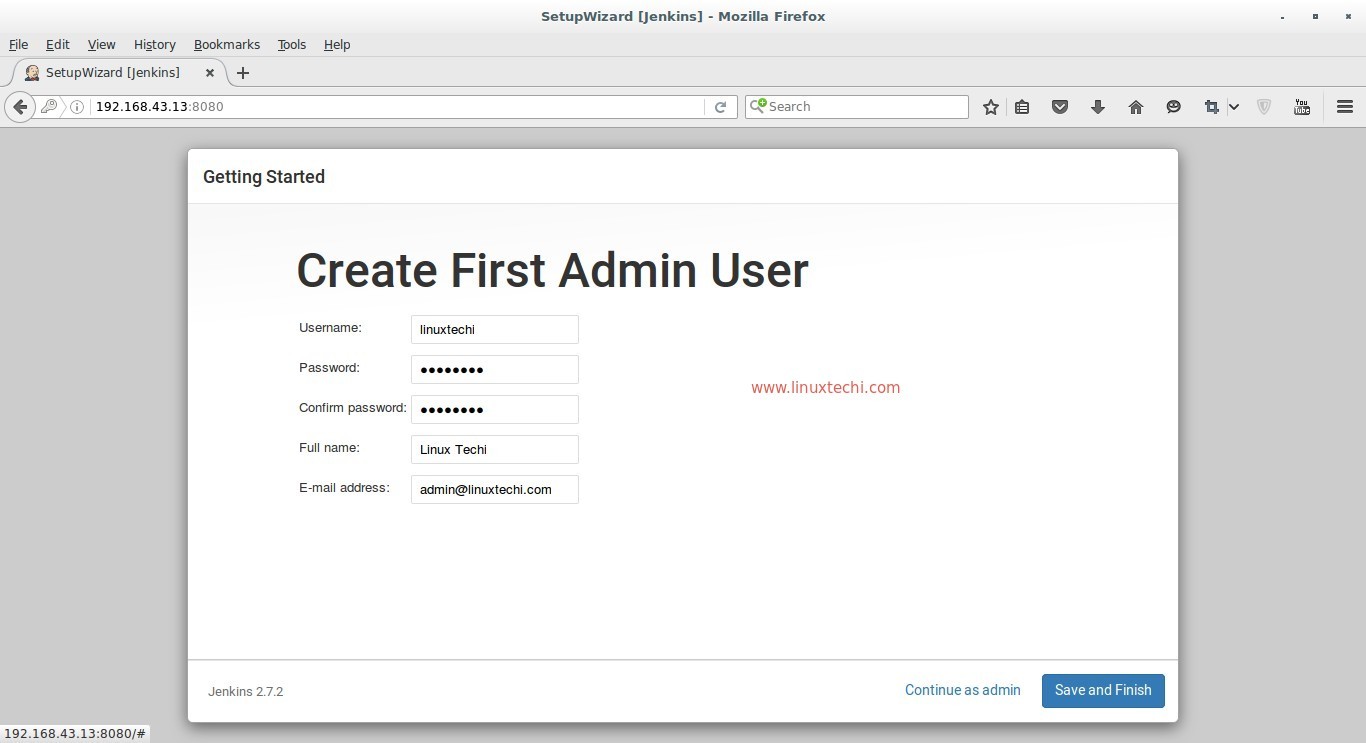
As we can see required plugin installation is in progress for Jenkins. Once it is done with plugin installation. It will ask to create Admin User
Admin-User-Jenkins-Portal-Centos7
Click on Save and Finish
Jenkins-Installation-Completed-Message
click on “Start using Jenkins”
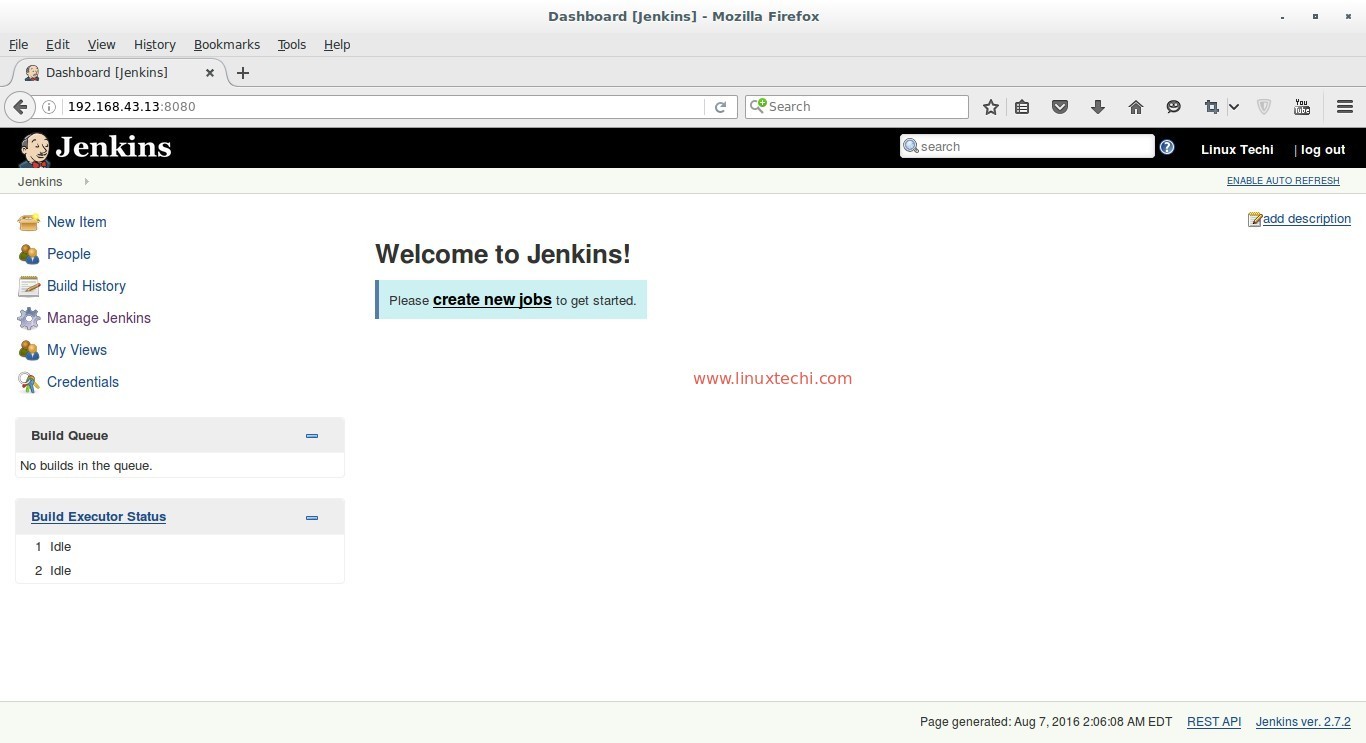
Jenkins-Dashboard-Centos7
Now Configure GitHub project using git plugin in Jenkins.
Let’s Assume I have a ‘cloudtechi’ project on GitHub and wants to integrate this project in Jenkins using git plugin.
Let’s first install git package on your machine on which you have installed Jenkins because Jenkins use git command to pull the GitHub project code.
[root@jenkins ~]# yum install git
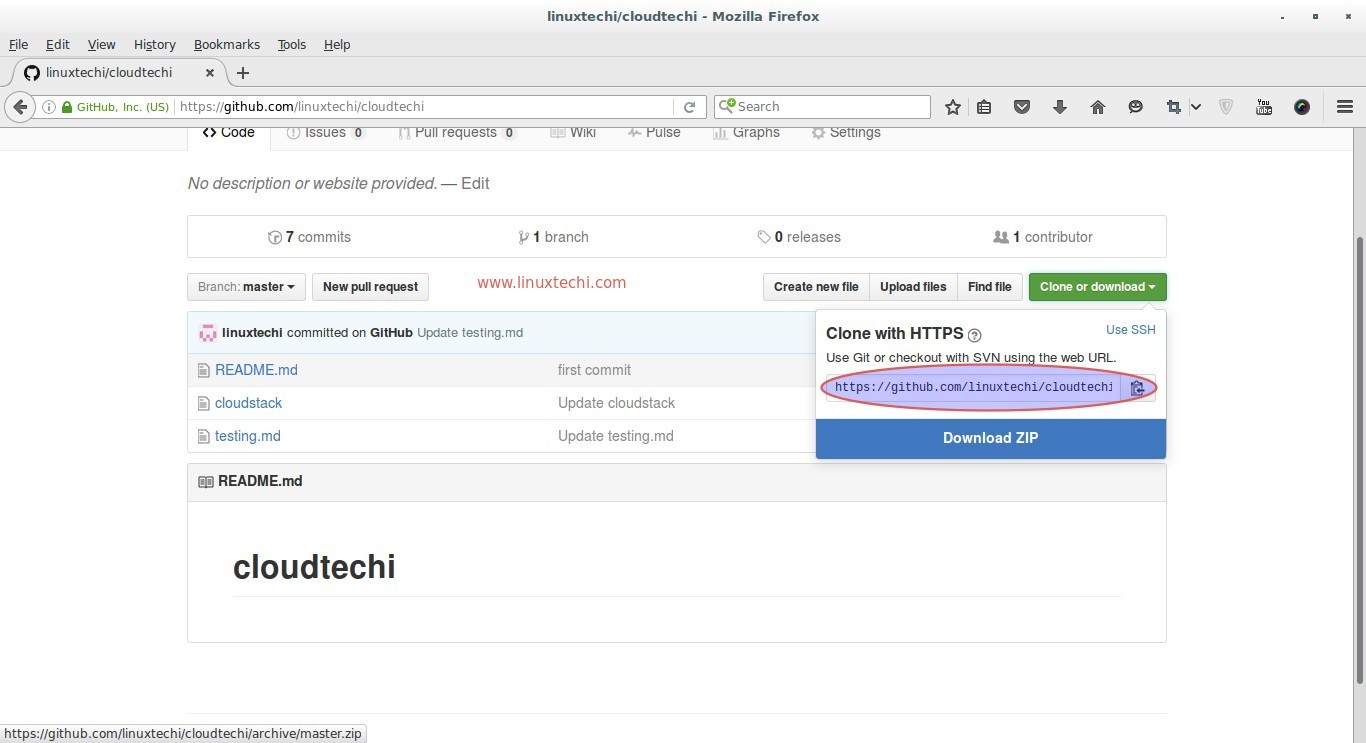
Login to the GitHub and get the Web URL of your project.
Github-Project-Web-URL
Login to the Jenkins portal, Click on “New Item”
Select the Freestyle Project and Specify the name as per your setup, In my case I putting as “techi_project”
NewItem-Name-Jenkins-Dashboard-Centos7
Click on OK
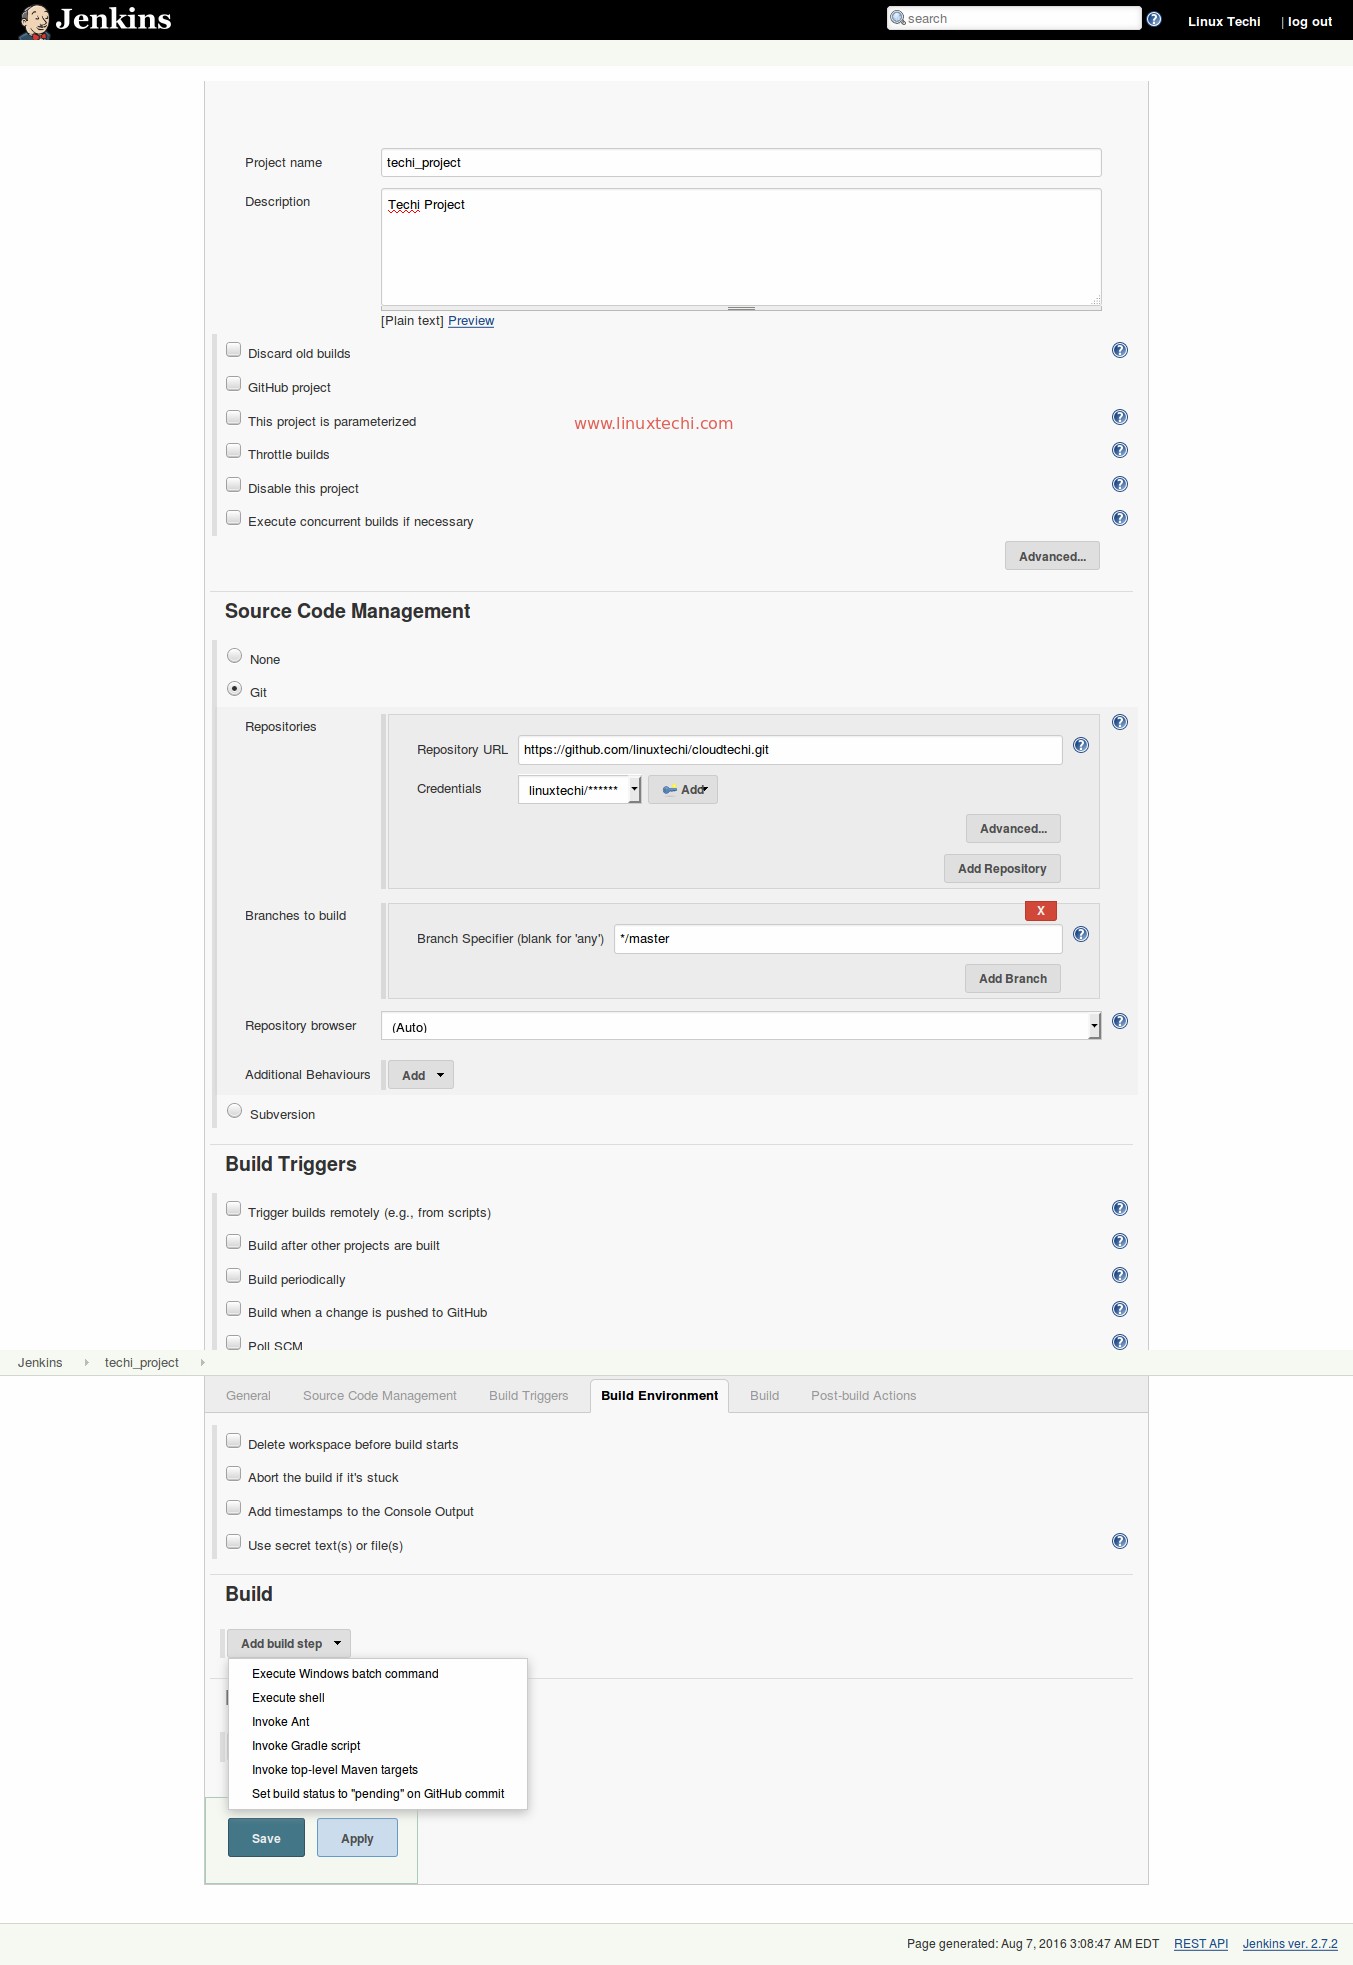
Specify the Project Description and Select Git option in Source Code Management Tab and specify the Web URL of your GitHub Project and its credentials. In the Build Tab select the option that suits your setup and then finally click on Apply.
GitHub-Project-Credentials-Jenkins-Centos7
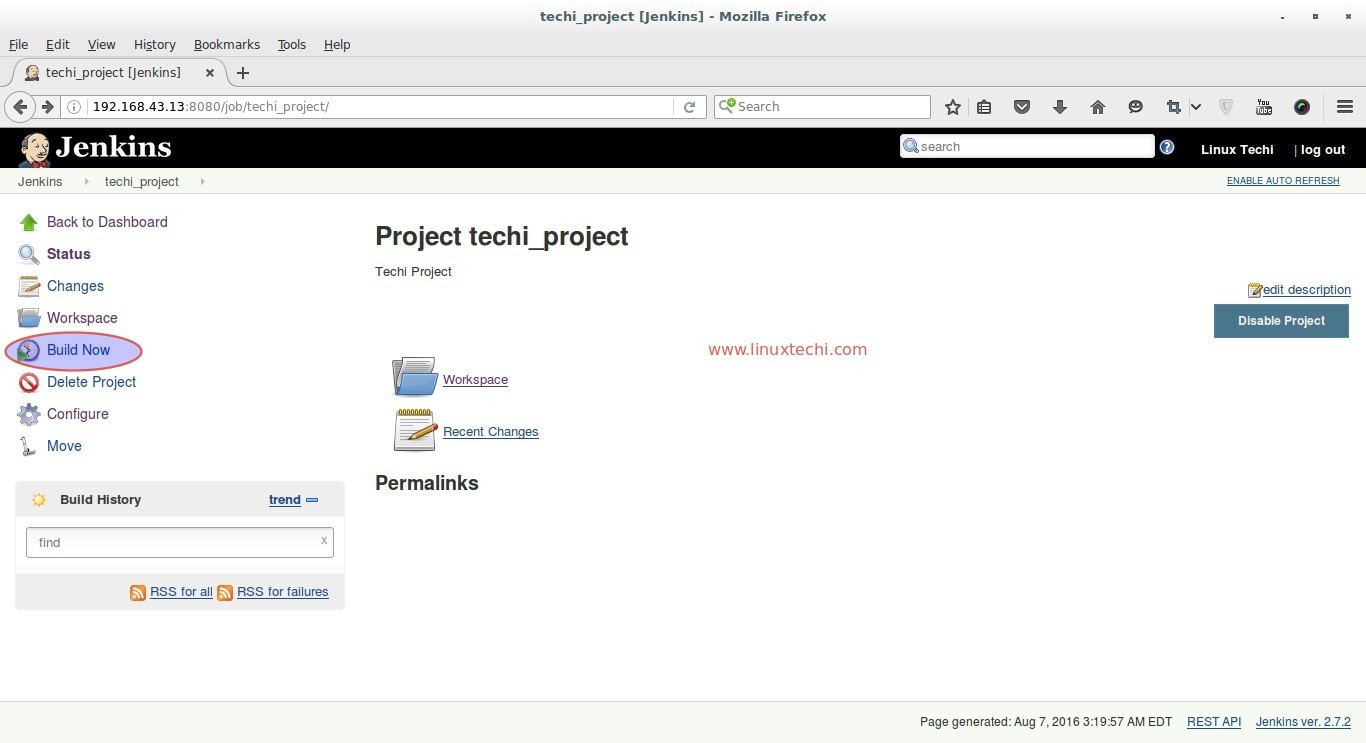
In the Next step click on the “Build Now” option from Jenkins Dashboard to pull the GitHub Project Code.
Build-GitHub-ProjectCode-Jenkins
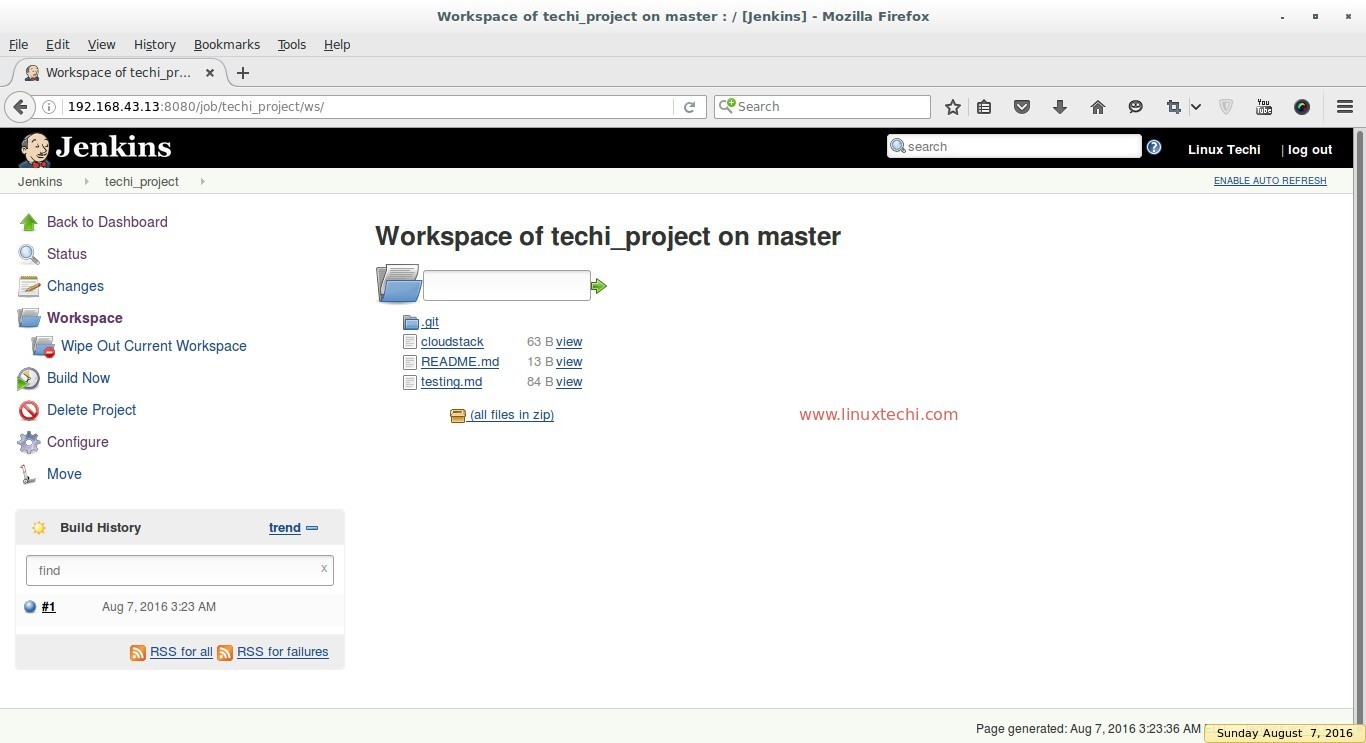
Click on the Workspace Option to view Code or files of GitHub Project. Whenever a new code is pushed on the GitHub project it will be automatically push to Jenkins workspace with new versions.
Workspace-GitHub-Project-Jenkins
we can also view the project workspace from terminal as well.
[root@jenkins ~]# cd /var/lib/jenkins/workspace/techi_project/
[root@jenkins techi_project]# ls -l
total 12
-rw-r--r--. 1 jenkins jenkins 63 Aug  7 03:23 cloudstack
-rw-r--r--. 1 jenkins jenkins 13 Aug  7 03:23 README.md
-rw-r--r--. 1 jenkins jenkins 84 Aug  7 03:23 testing.md
[root@jenkins techi_project]#
We can this code to deploy on other machines as well. That’s all, Basic Jenkins installation and configuration is completed ..

Kickstart Server Installation And Configration

Many system administrators would prefer to use an automated installation method to install Red Hat / CentOS / Fedora on their machines. To answer this need, Red Hat created the kickstart installation method. Using kickstart, a system administrator can create a single file containing the answers to all the questions that would normally be asked during a typical installation.
Kickstart files can be kept on a single server system and read by individual computers during the installation. This installation method can support the use of a single kickstart file to install Red Hat Enterprise Linux on multiple machines, making it ideal for network and system administrators.
Kickstart installation can be performed in different ways:
1) HTTP method.
2) NFS
3) FTP
Here I am explaining the HTTP method for kickstart installation in  vmware workstation, in my lab environment.
In kickstart installation, one machine will act as the kickstart server and another machine will be the client machine. Installation includes the following  major steps.
1) Mount the installation media to the kickstart server
2) Create kickstart configuration file.
3) boot the client machine from the boot image and mention the boot parametes in the boot prompt
Installation steps in detail:
Steps1:
Let the machine with IP address “192.168.133.128″ be the kickstart server for the installation. As we are using the HTTP methos of kickstart installation, make sure that apache is running in the server. If it is not running, start using the follwing command.
# /etc/init.d/httpd start
If it is not installed, install using command.
# yum install httpd
1
Step2:
The next part of the configuration will be to create the directory structure we will use to serve the installation files and populate them. You can create this directory structure from a CentOS / Redhat ISO image.
I am using a VM in Vmware to configure the kickstart. For creating the installation media, insert CentOS / Redhat ISO image to the kickstart server (192.168.133.128). You can do this as follows:
Go to Virtual Machine settings >> select CD/DVD (IDE) >> Browse the ISO image to “Use ISO image file section”
Once you insert the ISO image to the VM, you can see the mounted image in mount point “/media/CentOS_5.5_Final”.
2
We are using HTTP method of kickstart installation. So we need to re-mount this ISO image to document root of the apache server. By default /var/www/html will be the document root. So I created one folder named “dataServe” in /var/www/html and mount the ISO image to that path.
3
Now you can see the new mount point /var/www/html/dataServe with required directory structure.
4
Step:3
For next step, will need to build a kickstart file and copy it into /var/www/html/ks directory, where the clients will pull it from during install. Below is the example of a simple kickstart file I am using. Kickstart files can get very complex with scripts and custom settings which is why we are going to use this basic template.
++++++++++++++++++++++++++++++++++++++
[root@centos ~]# cat /var/www/html/ks/ks.cfg
# Kickstart file for a basic install.
install
url –url http://192.168.133.128/dataServe/
lang en_US.UTF-8
keyboard us

#Assign Ip address to client during boot time
network –device eth0 –bootproto static –ip=192.168.133.132 –netmask=255.255.255.0 –gateway 192.168.133.2 –nameserver 192.168.133.2 –hostname centos –noipv6
#rootpw –iscrypted
# Enable the firewall and open port 22 firewall –enabled –port=22:tcp
# Setup security and SELinux levels authconfig –enableshadow –enablemd5 selinux –permissive
# boot loader location bootloader –location=mbr –driveorder=sda
#set time zone timezone –utc America/New_York
#wipe all the partitions and create the below.
clearpart –drives=sda –all –initlabel
part /boot –fstype ext3 –size=100 part / –fstype ext3 –size=5000 part swap –size=1024 part /home –fstype ext3 –size=100 –grow
# install the base and core packages with open ssh client and server
%packages
@Core
@Base
openssh-clients
openssh-server

++++++++++++++++++++++++++++++++++++++++
Now everything is done for kickstart server.  The kickstart server has been built, the kickstart file is in place, and you are ready to boot up your client to start testing a kickstart installation.
Step4:
To boot up the client machine, we need boot image file. This file can be available from CentOS / Redhat download page with name “netinstall.iso”. Otherwise you can get it from the installation media itself.
See the path “/media/CentOS_5.5_Final/images/boot.iso”.
5
Create a new virtual machine as client machine and Insert this “netinstall.iso” or “boot.iso” client machine.
Same as the procedure mentioned in step2
[ Go to Virtual Machine settings >> select CD/DVD (IDE) >> Browse the ISO image to "Use ISO image file section" ]
7
Now boot the client machine from the “boot.iso” file.
Step5:
Boot the client machine from the netinstall.iso / boot.iso file and it will show the installation start page. Type the following line in the boot prompt.
boot:  linux text ks=http://192.168.133.128/ks/ks.cfg append ip=192.168.133.134 netmask=255.255.255.0
This command tells the client to boot the kernel, look for the 192.168.133.128 server (our kickstart server), retrieve the ks.cfg file from /var/www/html/ks/, and assign the client a static address of 192.168.133.134.
Please stop the iptables in the kickstart server if required [Incase if your client machie face any problem in retriving ks.cfg file]
15
There are two things to be noted here.  If you dont want to use a static address you will need a functional DHCP server with correct settings and  the static ip assignment can actually take place in the kickstart file however there is a bug in CentOS currently which prevents this from happening,  This is the reason why we specified the IP address via kernel boot parameters.  If you have typed the command correctly and the server is setup properly you will see the client begin to install the system automatically.
8
10
Just before starting the installation, it will ask for the root password. If you already specified the root password in the ks.cfg file, it wont ask for password.
11
After you type the password, it will start the installation of packages and once the installation is the completed, the client machine will ask for reboot.
Yes, your machine has been installed and booted up now using our kickstart server now… Now, happy practicing :-)